Category: Cybersecurity

  • HexStrike AI + Claude Code: The Future of Penetration Testing

    Artificial Intelligence is changing cybersecurity faster than most people realize.

    For years, penetration testers manually chained together tools like:

    • Nmap
    • Nuclei
    • SQLMap
    • Subfinder
    • Amass
    • Burp Suite

    But now a new generation of AI-powered security platforms is emerging.

    Instead of manually deciding which tool to run next, AI agents can analyze targets, choose tools, automate workflows, and assist researchers during penetration tests.

    One of the most interesting projects in this space is:

    👉 https://github.com/0x4m4/hexstrike-ai

    HexStrike AI combines AI agents, offensive security tools, and Model Context Protocol (MCP) integration into a single cybersecurity automation platform. According to the project documentation, it supports 150+ security tools and multiple AI agents for reconnaissance, vulnerability assessment, bug bounty workflows, and security research.
    In this article we’ll explore:

    • What HexStrike AI is
    • Why MCP is changing cybersecurity automation
    • How Claude Code connects to security tools
    • How to install HexStrike AI
    • How to configure MCP servers
    • Why AI-assisted penetration testing is becoming the future

    The Problem With Traditional Pentesting

    A modern penetration tester may use:

    • 20+ reconnaissance tools
    • Multiple vulnerability scanners
    • Manual command execution
    • Separate reporting platforms
    • Browser-based research
    • Cloud infrastructure

    The workflow becomes fragmented.

    A typical assessment often looks like:

    Recon → Enumeration → Scanning → Validation → Exploitation → Reporting

    Every stage requires switching tools.

    The biggest bottleneck isn’t finding tools.

    It’s orchestrating them efficiently.

    What Is HexStrike AI?

    HexStrike AI is an AI-powered MCP cybersecurity platform designed to connect AI agents with offensive security tools.

    Instead of treating AI like a chatbot, HexStrike AI treats AI as an operational assistant capable of interacting with security tooling. The project describes itself as an MCP server that enables AI agents such as Claude, GPT, Copilot, and others to run 150+ cybersecurity tools through structured workflows.

    https://cdn.embedly.com/widgets/media.html?url=https%3A%2F%2Fwww.youtube.com%2Fwatch%3Fv%3DtaPT9-ULjnw&type=text%2Fhtml&schema=google&display_name=YouTube&src=https%3A%2F%2Fwww.youtube.com%2Fembed%2FtaPT9-ULjnw

    Supported capabilities include:

    • Reconnaissance
    • Vulnerability scanning
    • OSINT
    • Network analysis
    • Forensics
    • Bug bounty automation
    • Reporting workflows

    What Is MCP?

    MCP stands for:

    Model Context Protocol

    It is an emerging standard that allows AI systems to connect with external tools and services.

    Think of MCP as:

    USB-C for AI tools.

    Instead of every AI application building custom integrations, MCP provides a standard way for AI agents to interact with:

    • Security tools
    • Databases
    • APIs
    • Filesystems
    • Browsers
    • Development environments

    Recent research describes MCP as becoming one of the major standards for connecting AI agents to external capabilities and tool ecosystems.

    Why Claude Code Changes Everything

    Claude Code introduced a major shift in how AI agents interact with technical workflows.

    Instead of only answering questions, Claude Code can:

    • Execute commands
    • Read files
    • Modify code
    • Work with repositories
    • Connect to MCP servers

    Research analyzing Claude Code describes it as an agentic system capable of tool usage, command execution, and external integrations.
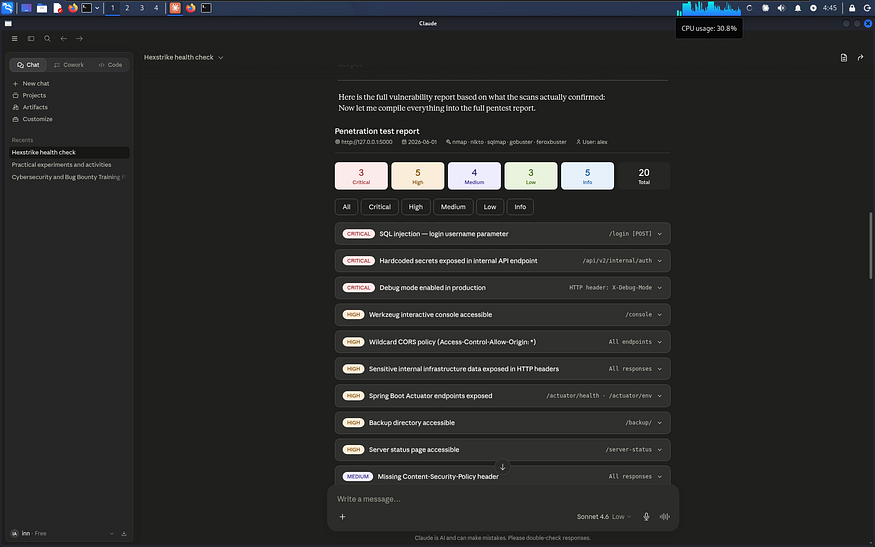
    This creates an entirely new model for offensive security:

    AI + Security Tools + Automation

    HexStrike AI Architecture

    A simplified workflow looks like this:

    User Request
    ↓
    Claude Code
    ↓
    MCP Server
    ↓
    HexStrike AI
    ↓
    Security Tools
    ↓
    Results & Analysis

    The AI becomes an orchestration layer sitting above traditional security tooling.

    Instead of manually selecting tools, AI can help coordinate workflows and interpret results.

    Supported Security Operations

    According to the project documentation, HexStrike AI integrates:

    Reconnaissance

    Examples:

    • Asset discovery
    • Subdomain enumeration
    • DNS intelligence

    Vulnerability Assessment

    Examples:

    • Automated scanning
    • Exposure analysis
    • Security checks

    Network Analysis

    Examples:

    • Traffic inspection
    • Service enumeration
    • Infrastructure mapping

    Security Reporting

    Examples:

    • Result summarization
    • Workflow automation
    • Research assistance

    The project currently advertises support for more than 150 security tools.

    Installing HexStrike AI

    Step 1 — Clone the Repository

    git clone https://github.com/0x4m4/hexstrike-ai.git
    cd hexstrike-ai

    Step 2 — Create Virtual Environment

    python3 -m venv hexstrike-env
    source hexstrike-env/bin/activate

    Windows:

    hexstrike-env\Scripts\activate

    Step 3 — Install Dependencies

    pip3 install -r requirements.txt

    These installation steps are provided within the project’s setup documentation.

    Starting the HexStrike MCP Server

    Launch the MCP service:

    python3 hexstrike_mcp.py

    Or start the API server if required by your workflow:

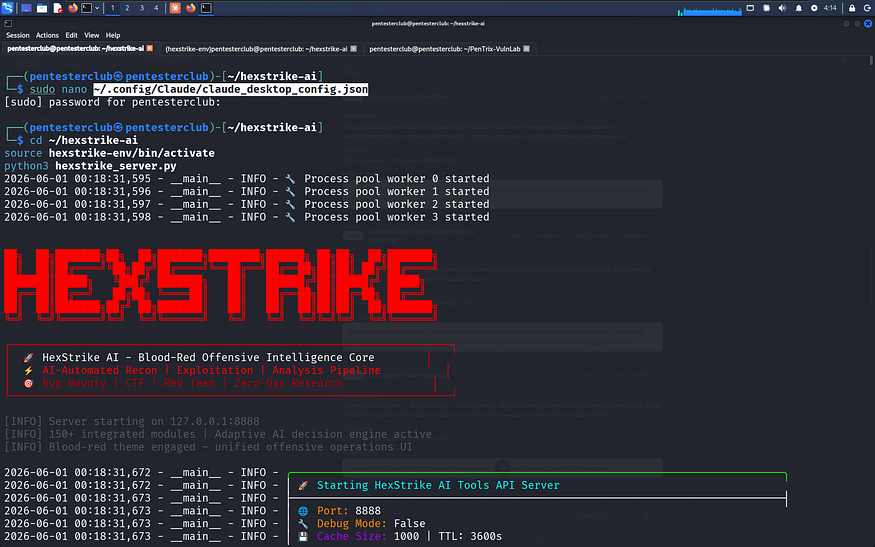
    python3 hexstrike_server.py

    The platform typically runs locally and exposes MCP-compatible functionality for AI clients.

    Setting Up MCP Servers in Claude Desktop

    One of the most powerful features is connecting HexStrike AI directly to Claude.

    Edit:

    ~/.config/Claude/claude_desktop_config.json

    Add:

    {
    "mcpServers": {
    "hexstrike-ai": {
    "command": "python3",
    "args": [
    "/path/to/hexstrike-ai/hexstrike_mcp.py",
    "--server",
    "http://localhost:8888"
    ]
    }
    }
    }

    This configuration is documented by HexStrike AI for Claude Desktop integration.

    Setting Up HexStrike AI in Claude Code

    Claude Code supports MCP server registration directly.

    Example:

    claude mcp add --transport stdio 0x4m4-hexstrike-ai python hexstrike_server.py

    After adding the MCP server:

    claude mcp list

    Verify that HexStrike appears in the active server list.

    Example MCP installation methods are documented across MCP directories and Claude Code integration guides.

    Setting Up MCP Servers in VS Code

    VS Code can also connect to HexStrike AI.

    Example configuration:

    {
    "servers": {
    "hexstrike": {
    "type": "stdio",
    "command": "python3",
    "args": [
    "/path/to/hexstrike-ai/hexstrike_mcp.py",
    "--server",
    "http://localhost:8888"
    ]
    }
    }
    }

    VS Code integration examples are included in the project documentation.

    Example Workflow

    Imagine asking Claude:

    Enumerate subdomains for target.com
    Run vulnerability assessment
    Analyze findings
    Generate report

    Instead of manually launching multiple tools, the AI can coordinate the workflow through MCP-connected tooling.

    This is one reason many researchers view MCP-based security automation as the next major evolution in offensive security operations.

    Why This Matters for Bug Bounty Hunters

    Traditional bug bounty workflows involve:

    • Manual recon
    • Multiple terminals
    • Constant context switching

    HexStrike AI aims to reduce that overhead by providing:

    • AI-assisted decision making
    • Workflow orchestration
    • Faster recon pipelines
    • Automated reporting

    The result is:

    More time analyzing vulnerabilities and less time managing tools.

    Security Risks of AI Pentesting

    There is also a serious security discussion happening around AI-powered offensive tools.

    Researchers have noted that MCP servers often execute with significant host access and can introduce new attack surfaces if not properly secured.

    Security considerations include:

    • Tool permissions
    • Local execution risks
    • API key management
    • Sensitive data exposure
    • Autonomous command execution

    Always isolate testing environments and use proper authorization.

    The Future of AI-Powered Penetration Testing

    The cybersecurity industry is moving toward:

    • AI-assisted reconnaissance
    • Autonomous vulnerability discovery
    • Multi-agent workflows
    • Continuous attack surface monitoring
    • Automated reporting

    Projects like HexStrike AI demonstrate how AI agents are evolving beyond simple chat interfaces into operational security assistants.

    The future may look like:

    Researcher → AI Agent → MCP Server → Security Toolchain

    Instead of manually orchestrating dozens of tools, the AI coordinates the workflow while the human focuses on strategy and validation.

    Final Thoughts

    HexStrike AI is one of the most ambitious examples of AI-driven offensive security automation currently available.

    By combining:

    • Claude Code
    • MCP Servers
    • Security Tooling
    • AI Agents

    it creates a glimpse into what penetration testing may look like over the next few years.

    The goal is not replacing security researchers.

    The goal is amplifying them.

    As MCP ecosystems continue growing, AI-assisted cybersecurity workflows will likely become a standard part of:

    • Bug bounty hunting
    • Red teaming
    • Security assessments
    • Vulnerability research

    The future of penetration testing is no longer just about tools.

    It’s about intelligent orchestration.

    And projects like HexStrike AI are pushing that future forward.

  • Setting Up Snort 3 as an IDS

    Setting Up Snort 3 as an IDS

    Intrusion Detection System (IDS) watches your actual traffic, matches it against known attack patterns, and alerts you when something looks wrong. Think of it as CCTV for your network instead of just a locked front door.

    Snort 3 is one of the best open-source options for this, it’s the same detection engine used in enterprise Cisco deployments, and you can run it for free on a basic Linux box. This guide walks through the full setup from scratch: installation, rules, configuration, and logging.

    What You’ll Need

    • A Linux machine
    • A free account at snort.org

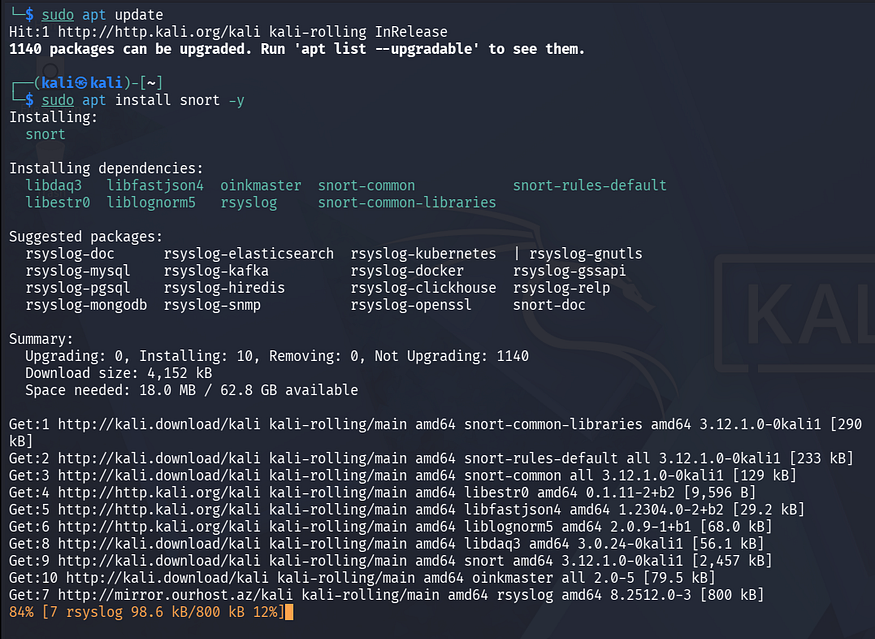
    Step 1: Install Snort 3

    Install Snort 3 using package manager:

    sudo apt install snort

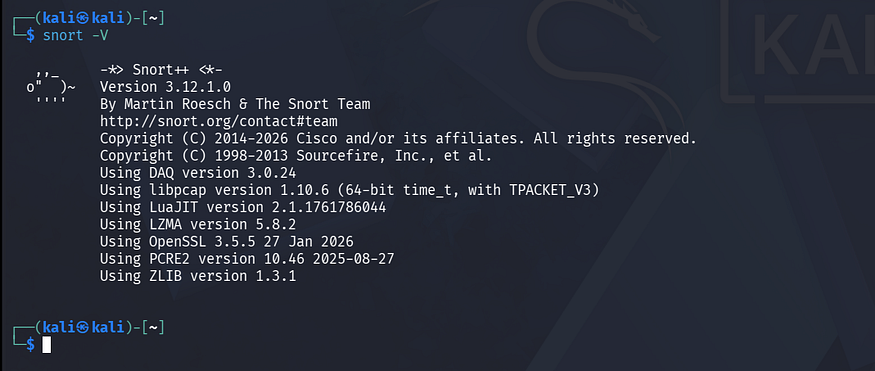
    Once it’s done, verify it installed correctly and check the version:

    snort --version

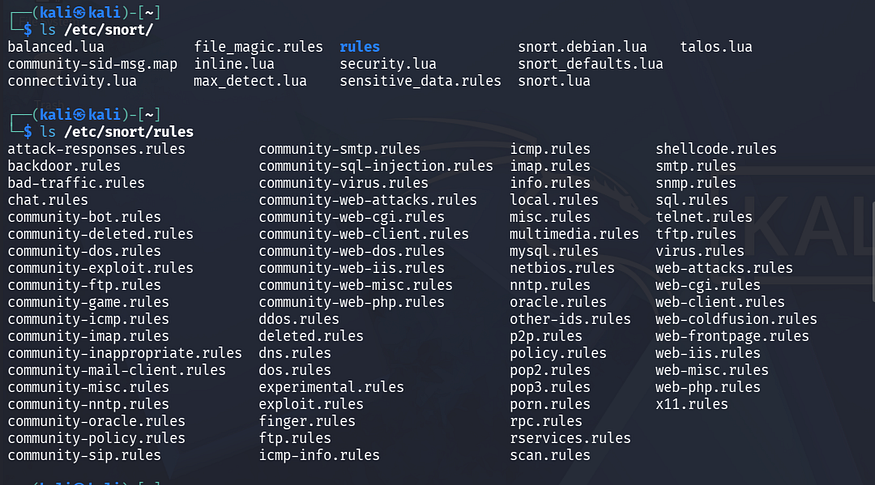
    Step 2: Create the Rules Directory

    Snort expects rules to live at /etc/snort/rules/.

    This is where everything goes; community rules, registered rules, and any custom rules you write yourself. It might not exist yet after a fresh install:

    sudo mkdir -p /etc/snort/rules

    Step 3: Download the Community Rules

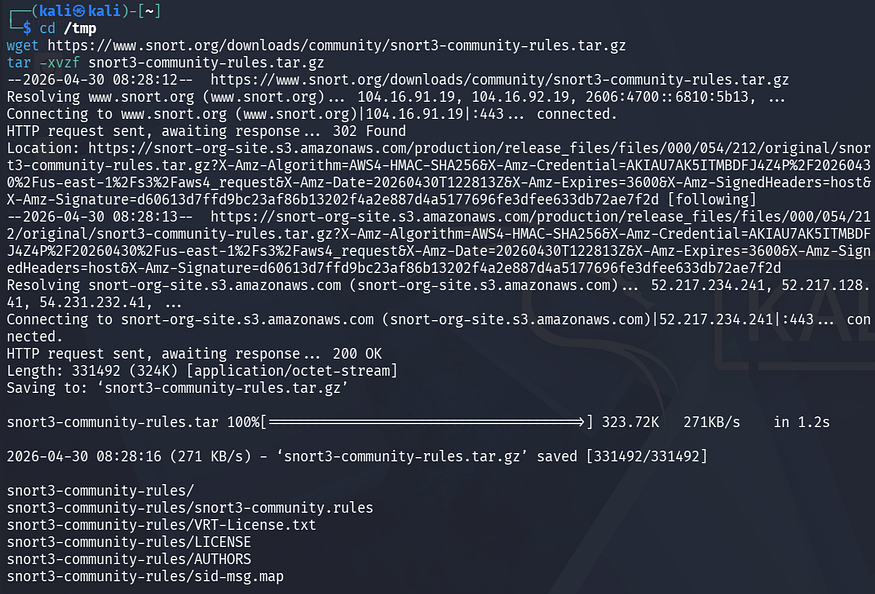
    Snort ships with a free set of community rules that anyone can grab without registering. Download them directly:

    wget https://www.snort.org/downloads/community/snort3-community-rules.tar.gz

    Extract and copy the rules into the rules directory:

    tar -xvzf snort3-community-rules.tar.gz
    sudo cp snort3-community-rules/*.rules /etc/snort/rules/

    Community rules are a solid baseline. They cover a wide range of known threats and are maintained by the Snort community.

    Step 4: Get Your Registered Rules (Free, But Worth It)

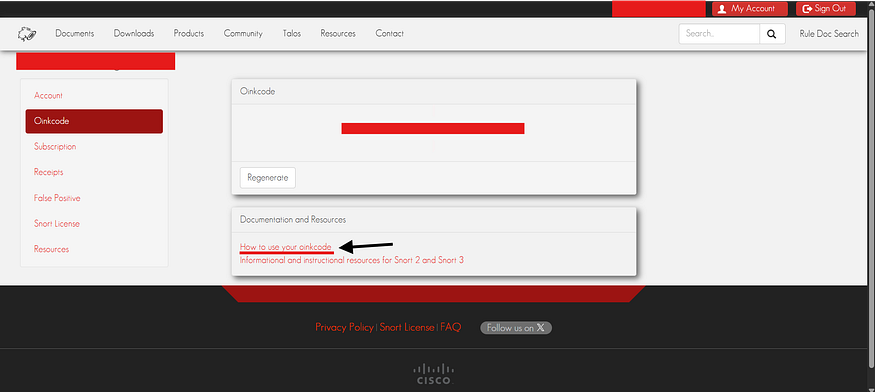
    Head over to snort.org and create a free account. After signing up, you’ll get an oinkcode(basically a personal token that unlocks the full registered rule set). These rules are maintained by Cisco Talos, one of the best threat intelligence teams out there, and they’re updated regularly.

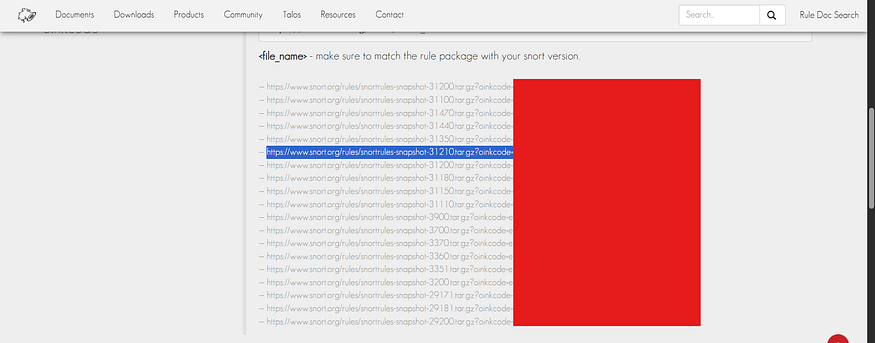
    Once you’re logged in and have your oinkcode, go to the rules download page. Click â€śHow to use your oinkcode”, it generates a direct download URL matched to your exact Snort version.

    For example, as my version is 3.1.21.0, the archive is named as for my snort version:

    snortrules-snapshot-31210.tar.gz

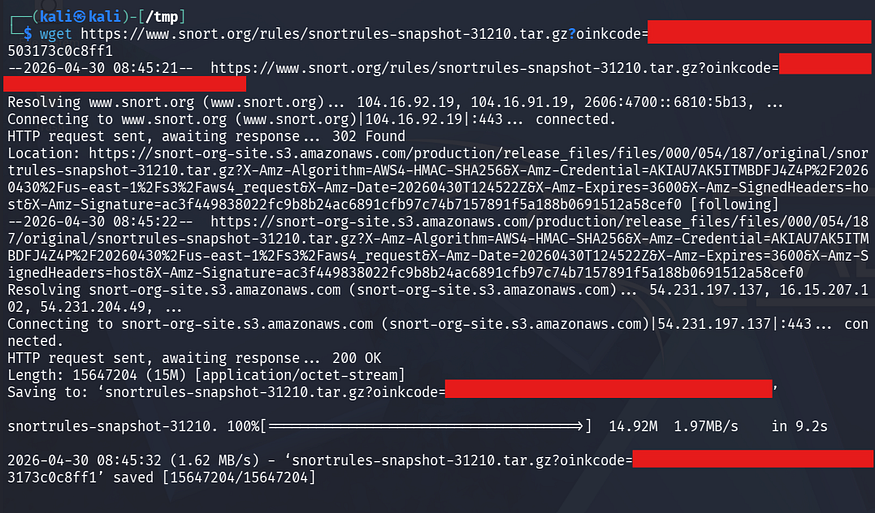
    Download it:

    wget "https://www.snort.org/rules/snortrules-snapshot-31210.tar.gz?oinkcode=YOUR_OINKCODE_HERE" -O snortrules-snapshot-31210.tar.gz

    Step 5: Extract and Organize the Rules

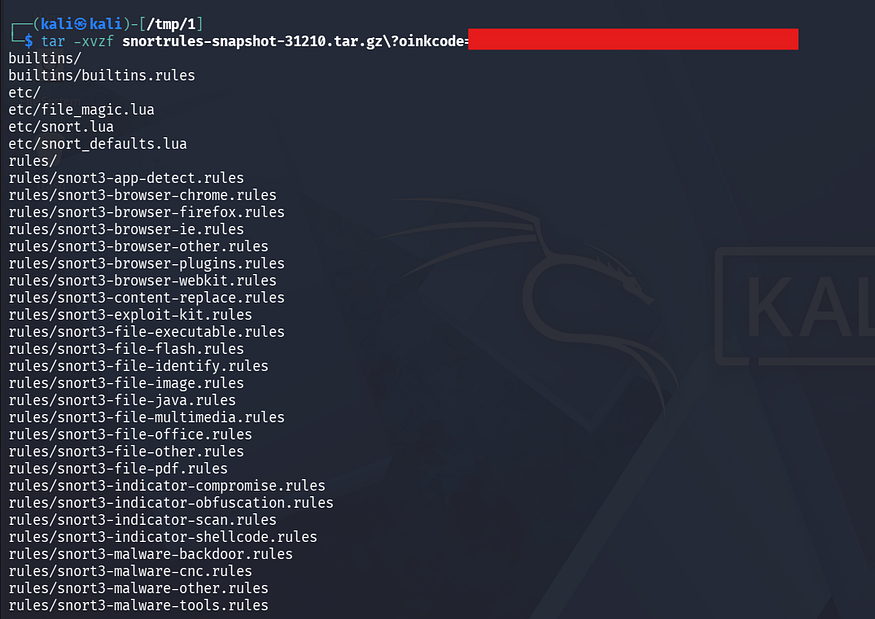
    Unpack the archive:

    tar -xvzf snortrules-snapshot-31210.tar.gz

    Inside, you’ll find three categories of rules:

    • rules/ — the main rule files (.rules format)
    • builtins/ — built-in detection logic compiled into Snort
    • so_rules/ — shared object rules (binary rules, faster but less transparent)

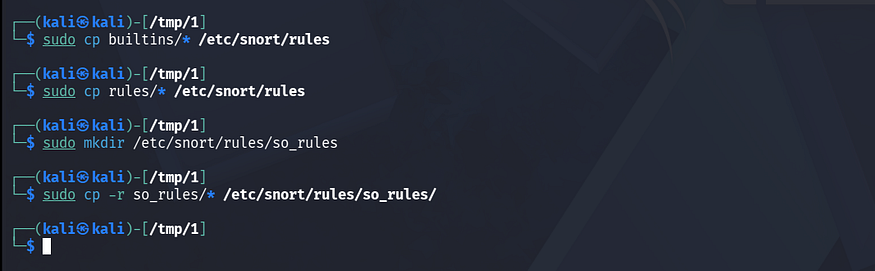
    Copy rules present in each directory into the right place:

    sudo cp builtins/* /etc/snort/rules/
    sudo cp rules/* /etc/snort/rules/
    # So_rules
    sudo mkdir /etc/snort/so_rules
    sudo cp so_rules/*.so /etc/snort/so_rules/

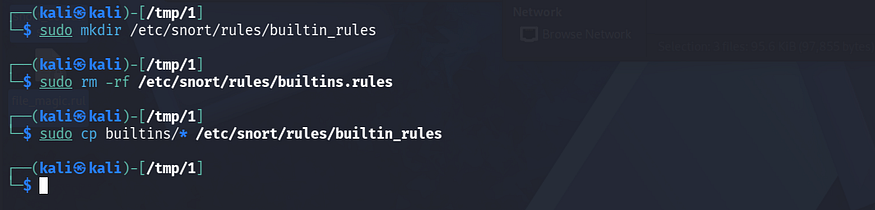
    Later, I moved the builtin rules into another directory:

    sudo mkdir /etc/snort/rules/builtin_rules
    sudo cp builtins/* /etc/snort/rules/builtin_rules/

    Now, as we have downloaded the rules, we will move forward Snort configuration.

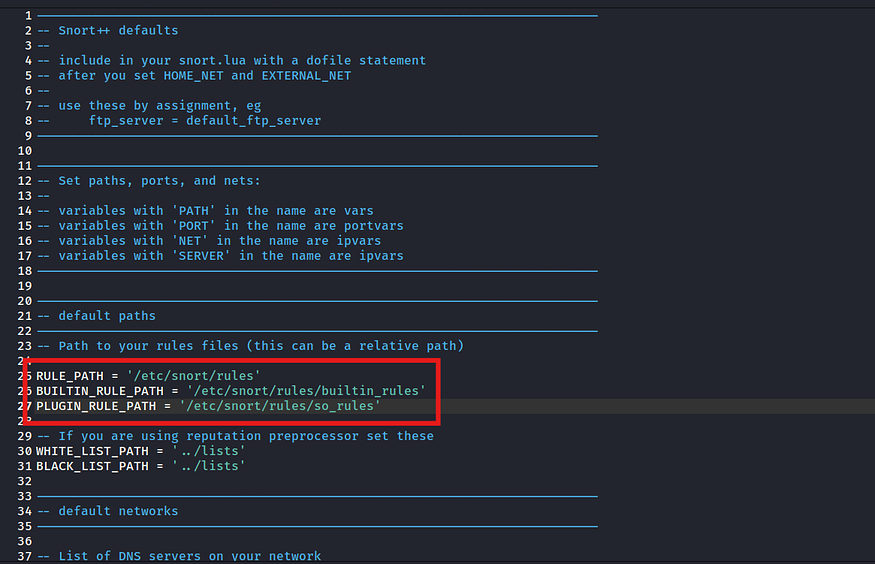
    Step 6: Set the Rule Paths in snort_defaults.lua

    Snort 3 ditched the old .conf format and moved to Lua-based config files. Open snort_defaults.lua:

    sudo nano /etc/snort/snort_defaults.lua

    Find the path variables and point them at your rules directories:

    RULE_PATH = '/etc/snort/rules'
    BUILTIN_RULE_PATH = '/etc/snort/rules/builtin_rules'
    PLUGIN_RULE_PATH = '/etc/snort/so_rules'

    These variables are referenced throughout the config, so setting them here means you don’t have to repeat full paths everywhere else.

    Step 7: Include the Rule Files in snort.lua

    Now open the main Snort config file:

    sudo nano /etc/snort/snort.lua

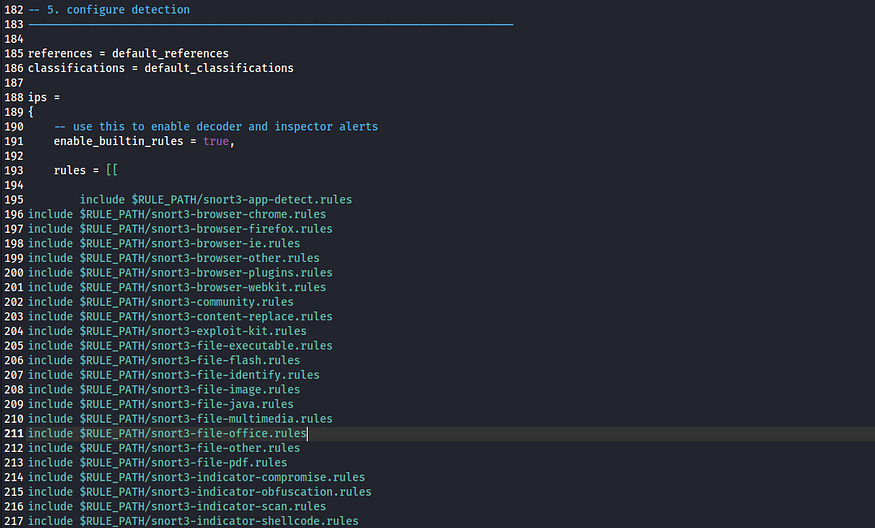
    Scroll to the ips section and add your rule includes. Add these to your snort.lua:

    enable_builtin_rules = true,

    rules = [[
    include $RULE_PATH/snort3-app-detect.rules
    include $RULE_PATH/snort3-browser-chrome.rules
    include $RULE_PATH/snort3-browser-firefox.rules
    include $RULE_PATH/snort3-browser-ie.rules
    include $RULE_PATH/snort3-browser-other.rules
    include $RULE_PATH/snort3-browser-plugins.rules
    include $RULE_PATH/snort3-browser-webkit.rules
    include $RULE_PATH/snort3-community.rules
    include $RULE_PATH/snort3-content-replace.rules
    include $RULE_PATH/snort3-exploit-kit.rules
    include $RULE_PATH/snort3-file-executable.rules
    include $RULE_PATH/snort3-file-flash.rules
    include $RULE_PATH/snort3-file-identify.rules
    include $RULE_PATH/snort3-file-image.rules
    include $RULE_PATH/snort3-file-java.rules
    include $RULE_PATH/snort3-file-multimedia.rules
    include $RULE_PATH/snort3-file-office.rules
    include $RULE_PATH/snort3-file-other.rules
    include $RULE_PATH/snort3-file-pdf.rules
    include $RULE_PATH/snort3-indicator-compromise.rules
    include $RULE_PATH/snort3-indicator-obfuscation.rules
    include $RULE_PATH/snort3-indicator-scan.rules
    include $RULE_PATH/snort3-indicator-shellcode.rules
    include $RULE_PATH/snort3-malware-backdoor.rules
    include $RULE_PATH/snort3-malware-cnc.rules
    include $RULE_PATH/snort3-malware-other.rules
    include $RULE_PATH/snort3-malware-tools.rules
    include $RULE_PATH/snort3-netbios.rules
    include $RULE_PATH/snort3-os-linux.rules
    include $RULE_PATH/snort3-os-mobile.rules
    include $RULE_PATH/snort3-os-other.rules
    include $RULE_PATH/snort3-os-solaris.rules
    include $RULE_PATH/snort3-os-windows.rules
    include $RULE_PATH/snort3-policy-multimedia.rules
    include $RULE_PATH/snort3-policy-other.rules
    include $RULE_PATH/snort3-policy-social.rules
    include $RULE_PATH/snort3-policy-spam.rules
    include $RULE_PATH/snort3-protocol-dns.rules
    include $RULE_PATH/snort3-protocol-finger.rules
    include $RULE_PATH/snort3-protocol-ftp.rules
    include $RULE_PATH/snort3-protocol-icmp.rules
    include $RULE_PATH/snort3-protocol-imap.rules
    include $RULE_PATH/snort3-protocol-nntp.rules
    include $RULE_PATH/snort3-protocol-other.rules
    include $RULE_PATH/snort3-protocol-pop.rules
    include $RULE_PATH/snort3-protocol-rpc.rules
    include $RULE_PATH/snort3-protocol-scada.rules
    include $RULE_PATH/snort3-protocol-services.rules
    include $RULE_PATH/snort3-protocol-snmp.rules
    include $RULE_PATH/snort3-protocol-telnet.rules
    include $RULE_PATH/snort3-protocol-tftp.rules
    include $RULE_PATH/snort3-protocol-voip.rules
    include $RULE_PATH/snort3-pua-adware.rules
    include $RULE_PATH/snort3-pua-other.rules
    include $RULE_PATH/snort3-pua-p2p.rules
    include $RULE_PATH/snort3-pua-toolbars.rules
    include $RULE_PATH/snort3-server-apache.rules
    include $RULE_PATH/snort3-server-iis.rules
    include $RULE_PATH/snort3-server-mail.rules
    include $RULE_PATH/snort3-server-mssql.rules
    include $RULE_PATH/snort3-server-mysql.rules
    include $RULE_PATH/snort3-server-oracle.rules
    include $RULE_PATH/snort3-server-other.rules
    include $RULE_PATH/snort3-server-samba.rules
    include $RULE_PATH/snort3-server-webapp.rules
    include $RULE_PATH/snort3-sql.rules
    include $RULE_PATH/snort3-x11.rules
    include $RULE_PATH/community-ftp.rules
    include $RULE_PATH/community-icmp.rules
    include $RULE_PATH/community-mail-client.rules
    include $RULE_PATH/community-sip.rules
    include $RULE_PATH/ddos.rules
    include $RULE_PATH/experimental.rules
    include $RULE_PATH/local.rules
    include $RULE_PATH/x11.rules
    ]]

    The local.rules file at the bottom is where you can write your own custom detection rules later.

    First i copy all the names of all the rules files and asked an AI agent to give me all the rules in the below format and I pasted it in the snort.lua file.

    include $RULE_PATH/<rule-name>.rules

    A heads-up: not all rule files will load cleanly without errors. Before dumping in every file, you can run a quick test to see which ones cause issues:

    sudo snort -c /etc/snort/snort.lua -T 2>&1 | grep "ERROR:" | awk -F: '{print $2}' | sort -u

    Run this after adding files. Skip any rules that produce errors; Snort won’t start if even one file has a syntax problem.

    Step 8: Set Up Logging

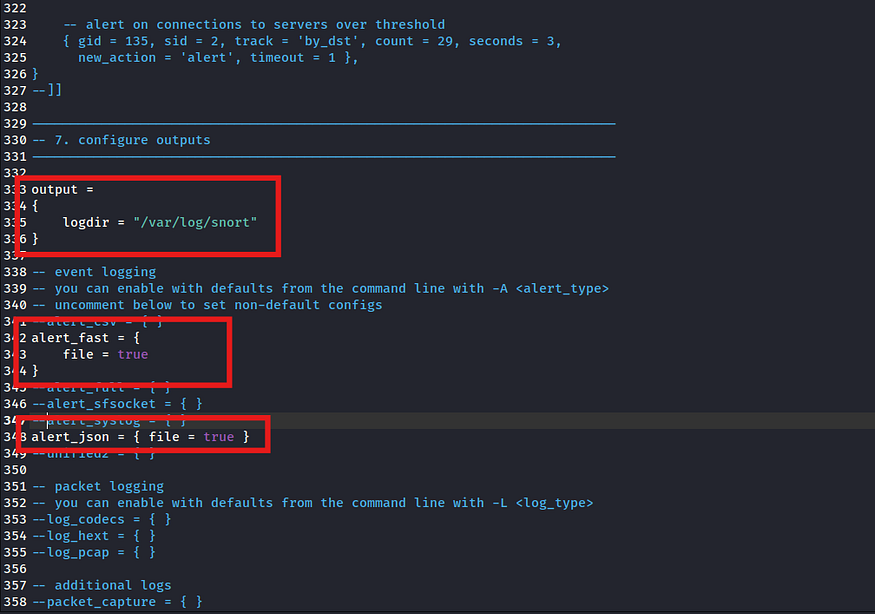
    Snort doesn’t write alerts anywhere unless you tell it where and how. Add this to snort.lua:

    output = { logdir = "/var/log/snort" }
    alert_fast = { file = true }
    alert_json = { file = true }

    Two formats on purpose:

    • alert_fast is human-readable — you can just tail -f this file and read what’s firing
    • alert_json is structured JSON — if you ever want to feed alerts into a SIEM like Wazuh or Elastic, this is what you’ll point it at

    Create the log directory if it doesn’t exist:

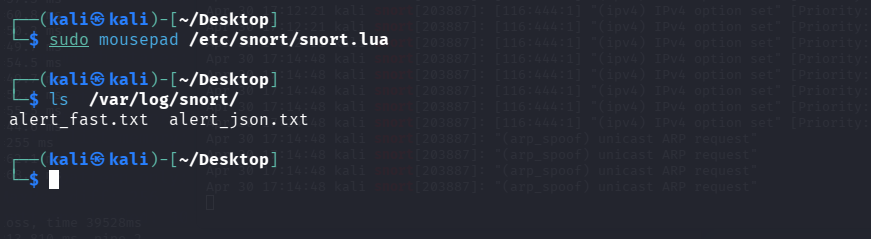
    sudo mkdir -p /var/log/snort

    Step 9: Test Before You Run

    Always test the config before going live:

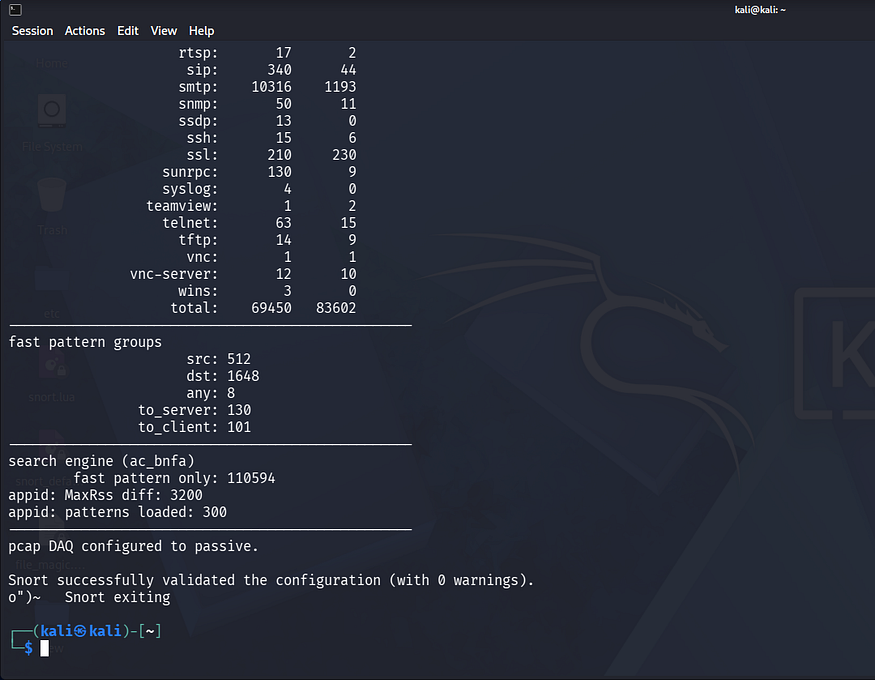
    sudo snort -c /etc/snort/snort.lua -T

    A clean test ends with:

    Snort successfully validated the configuration (with 0 warnings).

    If you see errors, that grep command from Step 7 is your friend. Identify the broken rule files, remove them from snort.lua, and test again. Sometimes it takes a few rounds and that’s normal.

    Step 10: Run Snort

    Start Snort on your network interface (replace <network_interface> with your actual interface):

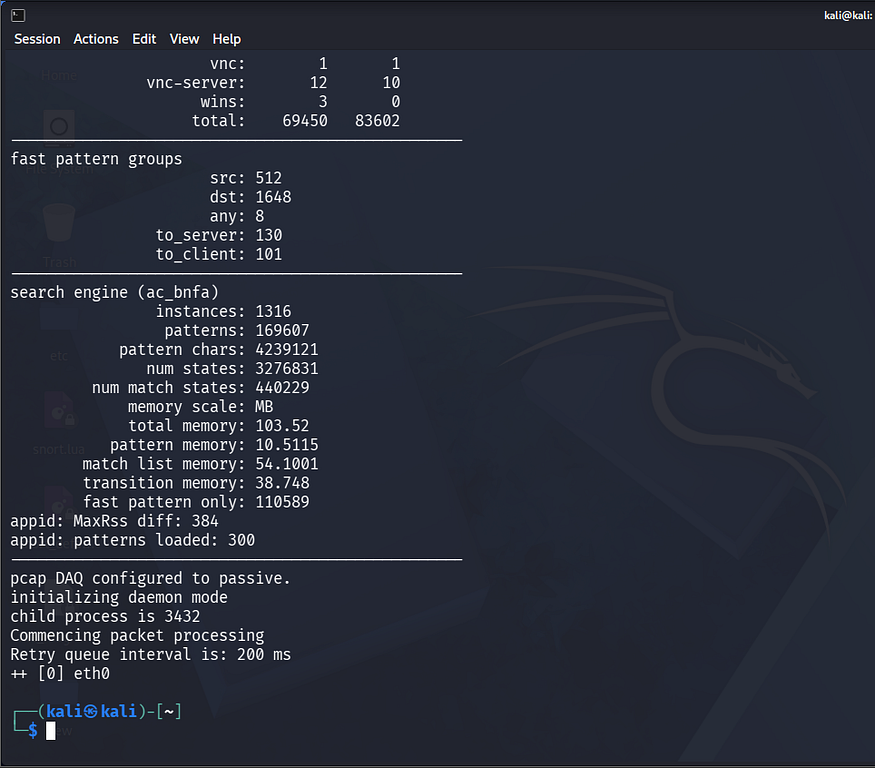
    sudo snort -c /etc/snort/snort.lua -i <network_interface> -D

    The -D flag runs it in the background. Snort will start inspecting traffic and writing alerts to /var/log/snort/.

    Watch alerts as they come in:

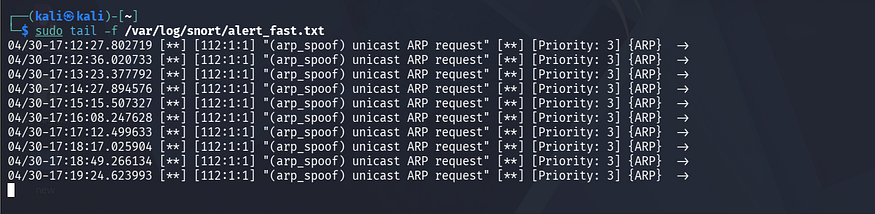
    sudo tail -f /var/log/snort/alert_fast.txt

    What’s Next

    This setup gives us a working IDS with solid rule coverage. A few things worth doing from here:

    Automate rule updates. The Snort rule set is updated regularly. Consider a cron job or a tool like PulledPork 3 to keep your rules current.

    Forward logs to a SIEM. The JSON log format from alert_json is designed for this. If you’re running Wazuh, point its agent at /var/log/snort/alert_json.txt and you get Snort alerts showing up in the Wazuh dashboard.

    Consider moving to IPS mode. Snort 3 can also work in inline mode as an Intrusion Prevention System, actively blocking traffic that matches rules — not just alerting on it.

    Final Thoughts

    The install itself isn’t complicated once you understand the structure: get Snort, get the rules, tell Snort where the rules are, configure logging, test, run. Each step has a clear reason behind it.

    If certain rule files are throwing errors for you in Step 7, drop them in the comments with your Snort version. It’s a common issue and worth documenting which files are consistently problematic across versions.

    Found this useful? Follow for more hands-on security and infrastructure guides.